Thursday, April 30, 2009

Cream Sauce - Minus The Guilt

I love Trader Joe's - I used to live right by one in Michigan, and went there pretty often. One did open in Nashville a few months ago, which I finally made it to...although due to some silly laws in the state...they don't sell my wine tower staple Two-Buck Chuck :( For those of you who don't know, it's actually a pretty decent wine that you can buy by the case.

But there other great things that I like at TJ's - one of them being the chicken sausages. So I picked up some Sundried Tomato & Basil sausages for the first time - we loved them - they are full of flavor and grill up quickly since they are fully cooked. They tasted great in the pasta, and I also used them in calzones (which will be blogged soon!) I love cream sauces, but don't make it often...but this one isn't too heavy since it uses half and half cream, and blending the tomato mixture creates a thicker consistency.


Sun Dried Tomato Cream Pasta with Sausage and Spinach

1/2 cup onion, chopped
3 cloves garlic, minced
2 tbsp EVOO
kosher salt and freshly ground pepper to taste
pinch of sugar
2 (or more) grilled sausages, sliced I used Trader Joe's Sun Dried Tomato Chicken Sausages
28 oz can whole tomatoes, coarsely chopped with juice
3 tbsp softened sun dried tomatoes, julienned
1/2 cup plus 2 tbsp of half and half cream
2.5 cups baby spinach
1/2 box pasta (I used penne rigate)
handful of freshly chopped parsley and basil

Heat EVOO is a pot over medium heat. Add onions, saute for a couple of minutes, add garlic, and saute for another 3 minutes or so till softened. Add tomatoes, kosher salt and pepper, sun dried tomatoes and bring to a boil. Reduce heat and simmer for about 10 minutes.

Meanwhile, grill or pan fry sausages till done. Slice and set aside.

Prepare pasta according, removing from heat a couple of minutes before being done, it will finish cooking in the sauce. Drain, reserve some cooking liquid and set aside.

Remove sauce from heat and puree in a food processor or blender till desired. Return sauce to pot, add sausages and spinach and cook for 5 minutes. Reduce heat to medium-low, add in cream and stir till blended and thickened. Add in pasta, parsley, basil and a little of the pasta cooking water, simmer on low for a couple of minutes. Serve with parmesean cheese and additional fresh herbs.

Tuesday, April 28, 2009

Recipe Revisit - Chicken Gyros & Tzatziki

I have revisited one of my favorite meals many times since my original post My Big But Not-Fat Greek Dinner. The first time around, I made it with a kebab recipe that I sort of turned into a gyro; this time it was more authentic since I used an actual chicken gyros recipe, which had only chicken, tzatziki, sliced tomatoes, onions and crumbled feta.

I thought about re-doing the entire post, since I made it this time with homemade whole wheat pitas, and my first picture...well...sucked. Even though this picture finally does this meal justice, I left the original post since I think it shows the advancement of my photo taking abilities, and just how far I've come since starting the blog. Opa!


Chicken Gyros
Elly Says Opa

1.25 lbs. chicken pieces AI used breast meat
4 cloves garlic, smashed
Juice of 1 lemon
2 tsp. red wine vinegar
2 Tbsp. extra virgin olive oil
2 heaping Tbsp. plain yogurt I used Greek yogurt
1 Tbsp. dried oregano I used fresh Greek oregano
salt and pepper
1/2 batch of tzatziki
sliced tomatoes
sliced onions
4 (pocketless) pitas

Whisk together the garlic, lemon juice, vinegar, oil, yogurt, and oregano in a bowl. Add the chicken and rub the marinade in. Cover and refrigerate for about an hour.
Preheat the broiler (or grill, or pan on the stove). Sprinkle the chicken with salt and pepper on both sides, and then broil until cooked through, about 5 minutes per side, depending what size/type chicken you are using. Allow the chicken to rest for a few minutes before slicing into strips.

Meanwhile, heat your pitas. I have a gas stove, so I just spray them with a little bit of oil and stick them right on the burner for a few seconds per side. Top the pita with the chicken, tzatziki, tomatoes, onions. Roll up and eat!

What a P-I-T-A

Now that I finally have some success in baking and working with yeast, I thought "Why not try making bread?" After putting it off for a while now (chickening out) I decided to make pita bread to go with one of my favorite dinners - chicken gyros.

Well.....due to my sub par baking and planning skills, and ability to work with flour and cornmeal without turning the kitchen into a disaster zone....making and cleaning up after the pitas were a pain-in the you-know-what.

It wasn't the recipe...it was me. I learned 2 lessons - read the entire recipe carefully before beginning, and leave some extra time before when you need them for the meal. But overall, the end result was wonderful - although they weren't perfectly round or completely flat, they were fresh, soft & tasty. I definitely noticed a difference than store bought pitas, and I would make a double batch of these again to freeze.

Whole Wheat Pita Bread
Found on Confections of a Foodie Bride; Originally from Gourmet

1 package active dry yeast
1 Tbsp honey
1 1/4 cups warm water (105–115°F)
1 1/2 cups bread flour or high-gluten flour, plus additional for kneading
1 1/2 cup whole wheat flour
1/4 cup extra-virgin olive oil
1 tsp salt
Cornmeal for sprinkling baking sheets

Stir together yeast, honey, and 1/2 cup warm water in a large bowl, then let stand until foamy, about 5 minutes. (If mixture doesn’t foam, discard and start over with new yeast.)

While yeast mixture stands, stir together flours in another bowl. Whisk 1/2 cup flour mixture into yeast mixture until smooth, then cover with plastic wrap and let stand in a draft-free place at warm room temperature until doubled in bulk and bubbly, about 45 minutes. Stir in oil, salt, remaining 3/4 cup warm water, and remaining 2 1/2cups flour mixture until a dough forms.

Turn out dough onto a floured surface and knead, working in just enough additional flour to keep dough from sticking, until dough is smooth and elastic, 8 to 10 minutes. Form dough into a ball and put in an oiled large bowl, turning to coat. Cover bowl with plastic wrap and let dough rise in draft-free place at warm room temperature until doubled in bulk, about 1 hour.

Set oven rack in middle of the oven. Preheat oven to 500°F.

Punch down dough and cut into 8 pieces. Form each piece into a ball. Flatten 1 ball, then roll out into a 6 1/2- to 7-inch round on floured surface with a floured rolling pin. Transfer round a baking sheet lightly sprinkled with cornmeal. Make 7 more rounds in same manner, arranging them on baking sheets. Loosely cover pitas with a clean kitchen towel and let stand at room temperature 30 minutes.

Transfer 4 pitas, 1 at a time, directly onto oven rack. Bake until just puffed and pale golden, about 2 minutes. Turn over with tongs and bake 1 minute more. Cool pitas on a cooling rack 2 minutes, then stack and wrap loosely in a kitchen towel to keep pitas warm. Bake remaining pitas in same manner. Serve warm.

Friday, April 24, 2009

PB & J - Not Just For Sandwiches!

Peanut butter & jelly - one of my favorite sandwiches and flavor combinations. When I saw this recipe for peanut butter and jelly shortbread wedges, I knew I just had to try it. I've never made shortbread before...so it came out a little darker on the edges than I would have liked, I should have taken it out of the oven a few minutes sooner. But overall, it tasted wonderful - and it would be a crime to serve this without a big glass of milk.


Peanut Butter and Jelly Shortbread Wedges
Seen on Cooking This And That; originally adapted from Culinary Concoctions by Peabody
Makes 8 wedges (or more)

nonstick baking spray
1/2 cup (1 stick) unsalted butter, room temperature
1/4 cup creamy peanut butter
1/2 cup sugar
large pinch of salt
1 teaspoon vanilla extract
1 1/4 cups all purpose flour
1/3 cup jelly (any flavor you want) I used grape jelly, but I look forward to making this again with a different flavor

Preheat oven to 350 degrees F. Coat bottom of 9-inch-diameter springform pan with nonstick spray.

Beat butter and peanut butter in large bowl until smooth, about 2 minutes. Add sugar and salt and beat until fluffy, about 2 minutes. Beat in vanilla. Add flour; beat on low speed just until blended.

Reserve 1/3 cup dough. Press remaining dough evenly over bottom of prepared pan. Spread jam over dough in pan, leaving 1/3-inch plain border. Crumble reserved dough over the jam layer.

Bake shortbread until dough edge is deep golden and dough on top looks dry and baked through, about 40-50 minutes. (I baked mine for about 46 minutes...my edges got a little dark, I should have taken it out at about the 43 minute mark)

Cool shortbread completely in pan. Release pan sides. Cut shortbread into wedges and store in an airtight container at room temperature.

Thursday, April 23, 2009

Beans, Beans, Beans

I'm so glad that I finally got around to making this black bean soup - it's been on my to-make-list for a while now. If you love black beans, Mexican flavors and eating something that you can feel good about - don't hesitate to make this dish! Even without meat, it is hearty due to the blending and doesn't have any butter or cream. (Bikini season is just around the corner...)


Black Bean Soup
Elly Says Opa

1 lb. dried black beans (or 3 cans prepared beans, drained and rinsed)
1 Tbsp. canola oil
1 large onion, diced
2 poblano peppers, diced
1 jalapeno (seeds/ribs removed or not, according to your choosing), minced
4 cloves garlic, minced
1 (15 oz.) can tomato sauce
7 cups vegetable broth
2 tsp. cumin
1.5 tsp. chili powder I used 1 tsp Mexican chili powder, 1/2 tsp ancho chili powder
1 tsp. oregano
1 bay leaf
1 cup corn I omitted
1 lime, juiced
toppings of your choice - I used sliced green onions, fat free sour cream and 2% Mexican shredded cheese.
I added 2 tbsp of freshly chopped cilantro after pureeing

If you’re using dried beans, pick over and rinse the beans, tossing anything that doesn’t look great. Use the overnight soak or quick soaking method for your beans (directions on the bag), and drain the beans when done soaking. Then, place the beans in a stockpot and cover with cold water (to a couple inches above the beans) and simmer for about 2 hours OR place the beans and water in your crockpot and cook on low for about 8 hours. The beans should be tender to the bite. Drain the beans.

In a large stockpot or dutch oven, heat the oil over medium heat. Add the onions, peppers, and garlic, cooking until tender. Stir in the tomato sauce, broth, cumin, chili powder, oregano, bay leaf, and beans. Season to taste with salt and pepper and bring to a boil. Reduce heat and simmer for 30 minutes, stirring occasionally.

Remove the bay leaf and puree about 1/3 of the soup mixture. You can either put a few cups of the soup in a food processor or you can do what I did and spoon some of the mixture into a large bowl, and then use an immersion blender for what remains in the stockpot. Add everything back into the stockpot, stir in corn, and lime and heat through. Season to taste if necessary.


Nutritional Information Per Serving: Calories: 193 /Fat: 3.6g / Saturated Fat: 0.3g / Carbs: 32.7 / Fiber: 9.4g / Protein: 10.1g

Tuesday, April 21, 2009

Fake Out Take Out - Egg Rolls

After enjoying the Kung Pao Chicken, I found myself still in an Asian food kind of mood. When the hubby suggested egg rolls - I was definitely game - I had great success with Chicken Potstickers. I'll admit - there are a lot of ingredients and it is a long process - but it is easy and worth it - I doubt I will ever buy frozen egg rolls again. The egg rolls were amazingly full of freshness and flavor, I could have devoured the whole batch myself. (Sorry Jamie!) But restraint took over and we enjoyed a big bowl of steamed veggies to go with the egg rolls.

Serve egg rolls with plum, duck, teriyaki or whatever sauce you enjoy.


Cilantro-Lime Chicken Egg Rolls

2 cups shredded Napa cabbage
3 cloves garlic, minced
1 cup cooked (diced or shredded) chicken breast
1 tsp fresh ginger, shredded
1/2 cup carrot, shredded
1 cup yellow pepper, diced
2 green onions, thinly sliced
1 cup mushrooms, diced
1.5 cups bean sprouts
2 tbsp cilantro, chopped
1.5 tsp lime zest
squeeze of lime juice
3 tbsp low sodium soy sauce
1/2 tsp sesame oil
1 tbsp hoisin sauce
3 tbsp fat free chicken broth
dash of salt and pepper
egg roll wrappers
vegetable oil
plum or duck sauce

Heat 1-2 tbsp vegetable oil in large skillet on med-high heat.

In a small bowl, whisk together chicken broth, lime zest, lime juice, sesame oil, hoisin, soy sauce and a dash of salt and freshly ground black pepper. Set aside.

Add garlic and ginger, stir for a few seconds. Add peppers, mushrooms, carrots and sprouts. Cook for 3 minutes. Add in onions and cabbage and continue to cook for 2 more minutes. Add in soy mixture and stir till combined. Cook just until cabbage is wilted and veggies are softened. Stir in cilantro.

Remove from heat and let cool. Once filling has cooled, fill the egg rolls with approximately 2 tbsp of filling, or adjust accordingly. I filled the egg rolls with the wrappers diagonally - put the filling in the center, roll the bottom tightly over the filling, fold in the sides, slightly moisten the top of the wrapper and fold down and over, pressing to make sure all edges are sealed.

If making ahead of time, place a dampened paper towel over egg rolls to prevent them from drying out. I got 12 egg rolls from this batch of filling.

To cook: Heat a large skillet with two tbsp of vegetable oil over medium-high heat. Place egg rolls in skillet and fry on each side for about 4 minutes, until browned and crispy. Remove and place on a paper towel lined plate. Enjoy!

To freeze: Place egg rolls in a single layer on a cookie sheet. Once slightly frozen, remove and place in freezer bag. Thaw before using, and then cook as above.

Sunday, April 19, 2009

Fake Out Take Out - Kung Pao Chicken

Although I wouldn't say that I love spicy foods, once in a while I get that craving and I can take the heat. Although I have made Kung Pao Chicken before, and was satisfied with the result, I thought I'd try a different recipe. I've always been happy with the many recipes from Cook's Illustrated, and this time was no different. It was a speedy, easy & full of spicy deliciousness (yes that is a word!) and tastes even better than from a restaurant. Reduce the ciles or pepper flakes if you want to tone down the heat - and I served this alongside rice & steamed broccoli.


Kung Pao Shrimp
Cooks Illustrated

1.5 lb chicken tenders or breats, cut into strips
1 tablespoon dry sherry or rice wine
2 teaspoons soy sauce
3 medium cloves garlic, pressed through garlic press or minced
½ inch piece fresh ginger, peeled and minced
3 tablespoons peanut oil or vegetable oil
½ cup roasted unsalted peanuts
6 small whole dried red chiles, 3 chiles roughly crumbled, or 1 teaspoon dried red pepper flakes
¾ cup low-sodium chicken broth
2 teaspoons black rice vinegar or plain rice vinegar (I used plain rice vinegar)
2 teaspoons toasted sesame oil
1 tablespoon oyster sauce
1 tablespoon hoisin sauce
1½ teaspoons cornstarch
1 medium red bell pepper, cut into ½-inch dice (I used yellow bell pepper)
3 medium scallions, sliced thin

1. Toss shrimp with sherry and soy sauce in medium bowl; marinate until shrimp have absorbed flavors, about 10 minutes. Mix garlic, ginger, and 1 tablespoon oil in small bowl; set aside. Combine peanuts and chiles in small bowl; set aside. Mix chicken broth, vinegar, sesame oil, oyster-flavored sauce, hoisin sauce, and cornstarch in small bowl or measuring cup; set aside.

2. Heat 1 tablespoon oil in 12-inch skillet over high heat until just beginning to smoke. Add shrimp and cook, stirring about once every 10 seconds, until barely opaque, 30 to 40 seconds; add peanuts and chiles, stir into shrimp, and continue cooking until shrimp are almost completely opaque and peanuts have darkened slightly, 30 to 40 seconds longer. Transfer shrimp, peanuts, and chiles to bowl; set aside. Return skillet to burner and reheat briefly, 15 to 30 seconds. Add remaining 1 tablespoon oil, swirl to coat pan, and add red bell pepper; cook, stirring occasionally, until slightly softened, about 45 seconds. Clear center of pan, add garlic-ginger mixture, mash into pan with spoon or spatula, and cook until fragrant, 10 to 15 seconds; stir into peppers until combined. Stir broth mixture to recombine, then add to skillet along with reserved shrimp, peanuts, and chiles; cook, stirring and scraping up browned bits on bottom of pan, until sauce has thickened to syrupy consistency, about 45 seconds. Stir in scallions; transfer to serving plate and serve immediately.


* Don't eat the whole chilies!

Stuffed & Satisfied

I've made something similar to this before I started blogging, so I thought I'd revisit Mexican- style stuffed peppers. This is such an easy dish that requires a little prep and then the oven does all the work for you. Also, it's a pretty light meal that is really filling - you don't need any side dishes, and it could be lightened up even more by substituting ground turkey or chicken breast for the sirloin.

**** I have submitted this to the Foodie Films: Tortilla Soup, a Mexican themed blogging event on Joelen's Culinary Adventures. Check it out to enter your own Mexican-inspired recipes or for other events and recipes.


South Of The Border Stuffed Peppers

1/2 lb ground sirloin
2 large bell peppers, seeded/cored
1/2 can black beans, rinsed and drained
2 cloves garlic, minced
1/3 cup onion, finely chopped
1 cup cooked brown rice
1 cup fresh salsa
1/2 tsp cumin
1/2 tsp Mexican chili powder
salt and pepper to taste
1/4 tsp paprika
1/2-1/3 cup tomato sauce
1/2 can black beans, rinsed & drained
water
2% shredded Mexican blend cheese

Preheat the oven to 350. Prepare rice according to directions (I used quick cooking brown rice), drain and set aside.

Meanwhile heat a large skillet over medium heat, add the beef. While beef is still browning, add in the onions and garlic and continue to cook till meat is browned and onions and garlic is softened and drain.

Return beef mixture to skillet. Add in ingredients from cumin through paprika and 2 tbsp of water, stirring to coat. Add in the salsa, tomato sauce, beans and rice and heat through.

In a baking dish pour in a little tomato sauce and water (maybe 3 tbsp) to lightly coat the bottom and provide moisture. Fill in the peppers and place in dish. Add a couple of tablespoons of cheese on top and cover with tin foil.

After 30 minutes, remove foil and spoon juices over the peppers. Bake another 15-20 minutes, add a little more cheese on top if desired and bake another 5 minutes or so until melted.

* The recipe makes enough filling for 3-4 peppers. I filled only two for dinner, and the remaining filling was used for wraps - I heated the filling, put in a whole wheat low carb wrap, added a little more salsa and cheese, and heated in the microwave till the cheese melted.


Thursday, April 16, 2009

A Tale of Almost Two Failures

This is a different kind of post - I don't normally post about failures in the kitchen, but this wasn't a complete loss, and I'm always looking to improve.

So, while I love burgers, I often substitute veggie for the meat. Instead of always buying them, I thought I would try and make them. Well......so far the score is Mrs Sac - 0; Veggie Burgers - 2. One recipe was my own creation, while the other was from a website. I honestly don't know what is going wrong...but if anyone has any great tried and true recipe suggestions, leave them in my feedback :)

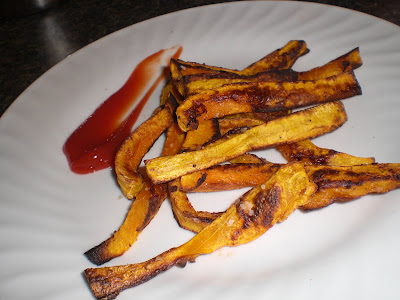
My side dish to go with the botched Boca-wannabe veggie burgers was butternut squash fries - I have wanted to make them for a while, and finally got around to it. I tasted the fries after 40-45 minutes - and they were amazing, perfectly browned and crisped - I could have eaten all of them myself! But since my main was ruined, I had popped in a couple of chicken burgers in the oven.

So while waiting for that to be done, my fries got a little soft and nearly burnt. If you cook them according to the directions; add your own herbs seasonings, they are wonderful and will make many reappearances in my kitchen. (Sorry potatoes)

PS I'll take a much better picture next time!


Butternut Squash Fries
Hungry Girl

Ingredients:

1/2 butternut squash
kosher salt
I added 1/2 tbsp EVOO, freshly ground black pepper & 1/2 tsp garlic powder

Directions:

Pre-heat oven to 425 degrees. Peel and de-seed your butternut squash. If you're unfamiliar with handling them, you may have a little trouble at first. They're fairly easy to peel, but you'll need a sharp knife to cut them. Once your orange friend is peeled and seed-free, slice it in half. Then cut it up into french fry shapes.


Place on a cookie sheet sprayed with non-stick spray. (I put mine in the oven while it was heating up) Cover lightly with kosher salt (I added pepper, EVOO and garlic powder) Place tray in your pre-heated oven and bake for 40 minutes or so, flipping halfway through baking process. Fries are done when they are starting to brown on the edges and get crispy. Serve with ketchup, or however else you enjoy fries or sweet potato fries!

Wednesday, April 15, 2009

Orange You Glad I Didn't Say Plain Banana Bread?

It's been a loooong time between posts - but what a great way to get back into the swing of things. I've had some ripened bananas that were just begging me to turn them into something yummy. I've made "regular" banana bread so many times, I was looking for something a little different.

This exceeded my expectations - this is a wonderful bread - one of my favorites so far. The orange zest adds an amazing punch and compliments the banana flavor, two fruits that I wouldn't have thought to pair with one another.


Orange Banana-Nut Bread
Cooking Light

Yield 1 loaf, 16 servings (serving size: 1 slice)

Ingredients

2 cups all-purpose flour
3/4 teaspoon baking soda
1/2 teaspoon salt
1 cup sugar
1/4 cup butter, softened
2 large eggs
1 1/2 cups mashed ripe banana (about 3 bananas)
1 1/2 tablespoons grated orange rind
3 tablespoons fresh orange juice
1/3 cup chopped walnuts
Cooking spray

Preparation

Preheat oven to 350ยบ.

Lightly spoon flour into dry measuring cups, and level with a knife. Combine the flour, baking soda, and salt, stirring with a whisk.

Place sugar and butter in a large bowl; beat with a mixer at medium speed until well blended (about 1 minute). Add eggs, 1 at a time, beating well after each addition. Add banana, rind, and juice; beat until blended. Add flour mixture; beat at low speed just until moist. Stir in walnuts; spoon batter into an 8 1/2 x 4 1/2-inch loaf pan coated with cooking spray.

Bake at 350° for 1 hour and 5 minutes or until a wooden pick inserted in center comes out clean. Cool 10 minutes in pan on a wire rack; remove from pan. Cool completely on wire rack.